Pulse Train Signal Generator

  • 365 Views
  • Last Post 02 November 2024
baerndorfer posted this 30 October 2024

hi all,

i like to provide you guys with a file for arduino uno which is able to produce a pulse-train with very acurate results. in script you can define frequency, duty-cycle, number of bursts and off-period.

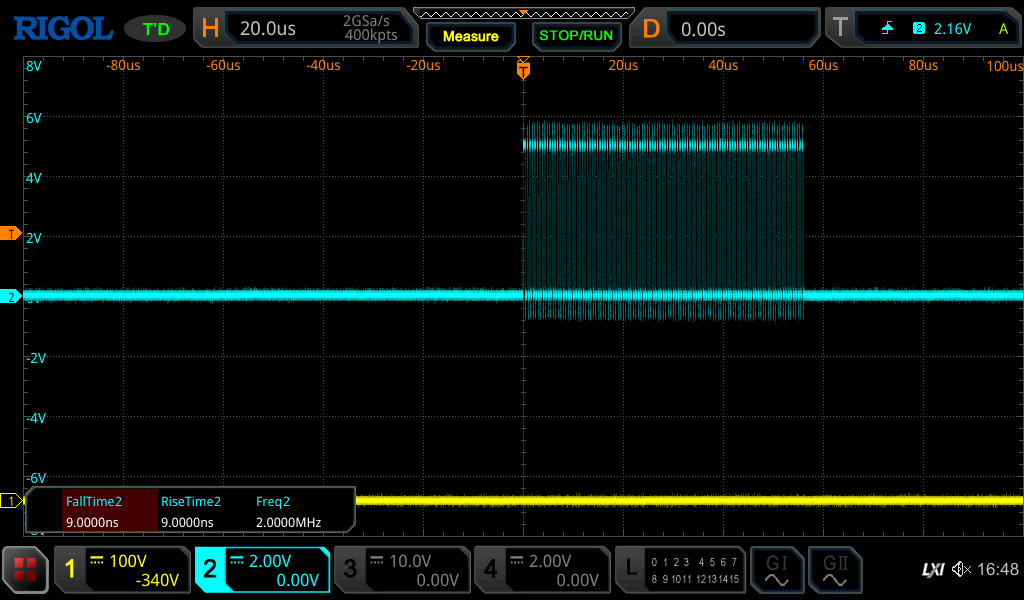
you will be able to produce pulses with very sharp rise- and fall-times in the nanosecond region. 
in the past i struggeled a lot to get this script working because i did not communicate with registers of microcontroller directly. now it works and you can use it if you like.

this is how it looks on oszilloscope..

you will find the .ino file as attachment

hope it is useful for somebody too.

regards

B

---

Technical Documentation

Overview
This script generates a pulse train PWM signal on pin 9 (OC1A) of the Arduino Uno. The PWM signal has adjustable parameters:
- Frequency (in Hz)
- Duty Cycle (as a percentage)
- Burst Cycles (number of PWM cycles per pulse burst)
- Off Period (duration in milliseconds between bursts)

The goal is to produce high-frequency PWM bursts separated by user-defined off periods, creating a modulated pulse train effect.

Dependencies
- Arduino.h and avr/io.h libraries: Used for direct register manipulation to configure Timer1 for PWM output.

Constants and Variables
- desiredFrequency: Defines the frequency of the PWM signal in Hz.
- dutyCyclePercentage: Controls the PWM duty cycle as a percentage.
- burstCycles: Specifies the number of PWM cycles in each burst.
- offPeriodMs: Defines the off-time in milliseconds between bursts.

Functions

1. setup()
This function configures the microcontroller to generate PWM on pin 9 and initializes the serial monitor to display detailed signal information.

- Pin Configuration:
  DDRB |= (1 << DDB1);
  Sets pin 9 (OC1A) as an output.

- Timer1 Configuration:
  TCCR1A = (1 << WGM11) | (1 << COM1A1);  // Fast PWM, non-inverting on OC1A
  TCCR1B = (1 << WGM13) | (1 << WGM12) | (1 << CS10);  // Mode 14, no prescaler
  - Mode 14 (Fast PWM) is set by configuring the Waveform Generation Mode (WGM) bits in TCCR1A and TCCR1B.
  - Non-inverting mode on OC1A is set by the COM1A1 bit.
  - No prescaling is chosen by setting the CS10 bit, allowing maximum resolution.

- Frequency and Duty Cycle Setting:
  setPWMPin9(desiredFrequency, dutyCyclePercentage);
  This function (explained below) calculates and sets the appropriate register values for the PWM frequency and duty cycle.

- Serial Monitor Initialization:
  Outputs the initial configuration details for the operator to verify settings.

2. setPWMPin9(unsigned long frequency, float dutyCycle)
This function calculates the required values for the Timer1 registers (ICR1 and OCR1A) based on the desired frequency and duty cycle, setting them accordingly.

- Frequency Calculation:
  unsigned int topValue = (16000000 / frequency) - 1;
  ICR1 = topValue;
  ICR1 defines the TOP value, setting the PWM frequency. With a 16 MHz system clock:
  ICR1 = 16000000 / frequency - 1

- Duty Cycle Calculation:
  unsigned int compareValue = (dutyCycle / 100.0) * ICR1;
  OCR1A = compareValue;
  OCR1A determines the on-time within each cycle based on the desired duty cycle. It is calculated as a percentage of ICR1.

3. loop()
This function manages the pulse train by controlling the on and off periods.

- Burst Generation:
  for (unsigned int i = 0; i < burstCycles; i++) {
      TCCR1A |= (1 << COM1A1);  // Enable PWM output
      delayMicroseconds(1000000 / desiredFrequency);  // One PWM cycle delay
  }
  The for loop runs for the specified number of burstCycles, enabling PWM output on each iteration by setting the COM1A1 bit in TCCR1A.

- Off Period:
  TCCR1A &= ~(1 << COM1A1);  // Disable PWM output
  PORTB &= ~(1 << PORTB1);   // Set pin 9 to LOW
  delayMicroseconds(offPeriodMs * 1000);  // Off-period delay in microseconds
  After completing the burst, PWM output is temporarily disabled by clearing COM1A1, which disconnects the PWM signal from pin 9. The pin is then explicitly set to LOW, and the script waits for the specified off-period.

4. printSignalDetails()
Provides detailed information about the current PWM signal configuration to the Serial Monitor, allowing the operator to review and verify each parameter.

Outputs Include:
- Frequency and Duty Cycle: Verifies desiredFrequency and dutyCyclePercentage.
- Timer Register Values: Shows ICR1 and OCR1A settings for debugging.
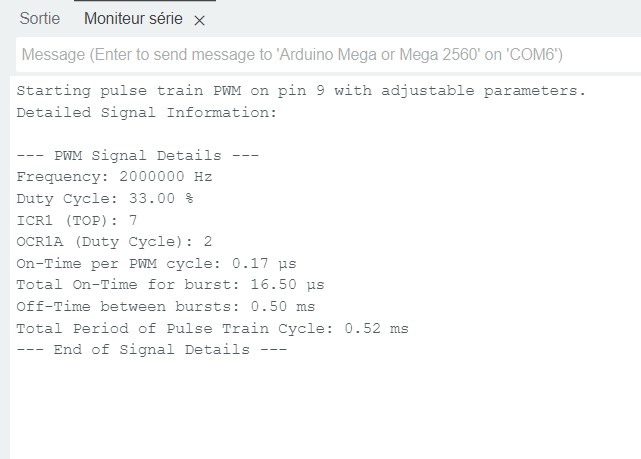
- On-Time per Cycle: Calculates and displays on-time for each PWM cycle based on the duty cycle.
- Total On-Time for Burst: The cumulative on-time for each pulse burst.
- Off-Time Between Bursts: Shows the configured off-period in milliseconds.
- Total Period of Pulse Train Cycle: The total duration (in ms) of a full pulse train cycle, including the on and off periods.

Execution Flow

1. Initialization:
   The script configures Timer1 in Fast PWM mode with specified frequency and duty cycle.
   Signal parameters are printed for verification.

2. Pulse Train Generation:
   In each loop, the script generates a PWM burst of burstCycles.
   After the burst, the PWM signal is disabled, and the pin is set LOW for the offPeriodMs duration, creating the pulse train.

3. Serial Monitoring:
   Each configuration detail is available on the Serial Monitor for precise verification.

Conclusion
This setup allows for real-time control and detailed feedback of a high-frequency pulse train PWM signal on pin 9. The operator can adjust the PWM frequency, duty cycle, burst length, and off-period, enabling highly customizable output signals.

Attached Files

Order By: Standard | Newest | Votes
baerndorfer posted this 30 October 2024

hi all,

i like to provide you guys with a file for arduino uno which is able to produce a pulse-train with very acurate results. in script you can define frequency, duty-cycle, number of bursts and off-period.

you will be able to produce pulses with very sharp rise- and fall-times in the nanosecond region. 
in the past i struggeled a lot to get this script working because i did not communicate with registers of microcontroller directly. now it works and you can use it if you like.

this is how it looks on oszilloscope..

you will find the .ino file as attachment

hope it is useful for somebody too.

regards

B

---

Technical Documentation

Overview
This script generates a pulse train PWM signal on pin 9 (OC1A) of the Arduino Uno. The PWM signal has adjustable parameters:
- Frequency (in Hz)
- Duty Cycle (as a percentage)
- Burst Cycles (number of PWM cycles per pulse burst)
- Off Period (duration in milliseconds between bursts)

The goal is to produce high-frequency PWM bursts separated by user-defined off periods, creating a modulated pulse train effect.

Dependencies
- Arduino.h and avr/io.h libraries: Used for direct register manipulation to configure Timer1 for PWM output.

Constants and Variables
- desiredFrequency: Defines the frequency of the PWM signal in Hz.
- dutyCyclePercentage: Controls the PWM duty cycle as a percentage.
- burstCycles: Specifies the number of PWM cycles in each burst.
- offPeriodMs: Defines the off-time in milliseconds between bursts.

Functions

1. setup()
This function configures the microcontroller to generate PWM on pin 9 and initializes the serial monitor to display detailed signal information.

- Pin Configuration:
  DDRB |= (1 << DDB1);
  Sets pin 9 (OC1A) as an output.

- Timer1 Configuration:
  TCCR1A = (1 << WGM11) | (1 << COM1A1);  // Fast PWM, non-inverting on OC1A
  TCCR1B = (1 << WGM13) | (1 << WGM12) | (1 << CS10);  // Mode 14, no prescaler
  - Mode 14 (Fast PWM) is set by configuring the Waveform Generation Mode (WGM) bits in TCCR1A and TCCR1B.
  - Non-inverting mode on OC1A is set by the COM1A1 bit.
  - No prescaling is chosen by setting the CS10 bit, allowing maximum resolution.

- Frequency and Duty Cycle Setting:
  setPWMPin9(desiredFrequency, dutyCyclePercentage);
  This function (explained below) calculates and sets the appropriate register values for the PWM frequency and duty cycle.

- Serial Monitor Initialization:
  Outputs the initial configuration details for the operator to verify settings.

2. setPWMPin9(unsigned long frequency, float dutyCycle)
This function calculates the required values for the Timer1 registers (ICR1 and OCR1A) based on the desired frequency and duty cycle, setting them accordingly.

- Frequency Calculation:
  unsigned int topValue = (16000000 / frequency) - 1;
  ICR1 = topValue;
  ICR1 defines the TOP value, setting the PWM frequency. With a 16 MHz system clock:
  ICR1 = 16000000 / frequency - 1

- Duty Cycle Calculation:
  unsigned int compareValue = (dutyCycle / 100.0) * ICR1;
  OCR1A = compareValue;
  OCR1A determines the on-time within each cycle based on the desired duty cycle. It is calculated as a percentage of ICR1.

3. loop()
This function manages the pulse train by controlling the on and off periods.

- Burst Generation:
  for (unsigned int i = 0; i < burstCycles; i++) {
      TCCR1A |= (1 << COM1A1);  // Enable PWM output
      delayMicroseconds(1000000 / desiredFrequency);  // One PWM cycle delay
  }
  The for loop runs for the specified number of burstCycles, enabling PWM output on each iteration by setting the COM1A1 bit in TCCR1A.

- Off Period:
  TCCR1A &= ~(1 << COM1A1);  // Disable PWM output
  PORTB &= ~(1 << PORTB1);   // Set pin 9 to LOW
  delayMicroseconds(offPeriodMs * 1000);  // Off-period delay in microseconds
  After completing the burst, PWM output is temporarily disabled by clearing COM1A1, which disconnects the PWM signal from pin 9. The pin is then explicitly set to LOW, and the script waits for the specified off-period.

4. printSignalDetails()
Provides detailed information about the current PWM signal configuration to the Serial Monitor, allowing the operator to review and verify each parameter.

Outputs Include:
- Frequency and Duty Cycle: Verifies desiredFrequency and dutyCyclePercentage.
- Timer Register Values: Shows ICR1 and OCR1A settings for debugging.
- On-Time per Cycle: Calculates and displays on-time for each PWM cycle based on the duty cycle.
- Total On-Time for Burst: The cumulative on-time for each pulse burst.
- Off-Time Between Bursts: Shows the configured off-period in milliseconds.
- Total Period of Pulse Train Cycle: The total duration (in ms) of a full pulse train cycle, including the on and off periods.

Execution Flow

1. Initialization:
   The script configures Timer1 in Fast PWM mode with specified frequency and duty cycle.
   Signal parameters are printed for verification.

2. Pulse Train Generation:
   In each loop, the script generates a PWM burst of burstCycles.
   After the burst, the PWM signal is disabled, and the pin is set LOW for the offPeriodMs duration, creating the pulse train.

3. Serial Monitoring:
   Each configuration detail is available on the Serial Monitor for precise verification.

Conclusion
This setup allows for real-time control and detailed feedback of a high-frequency pulse train PWM signal on pin 9. The operator can adjust the PWM frequency, duty cycle, burst length, and off-period, enabling highly customizable output signals.

Attached Files

AlteredUnity posted this 30 October 2024

Wow baerndorfer, this is wonderful work, very extensive. It's been a while since I messed with it, but this aligns very well with the programming I was trying to do with the PIC mcu's.

The rise and fall times are surprisingly fast. Thank you for sharing your work!

Jagau posted this 01 November 2024

Hello Bearndorfer


This Arduino .ino seems very interesting, I will try it tomorrow during the day and come back with it.
Thanks for the great effort.

Jagau

Jagau posted this 02 November 2024

Very nice demonstration Bearndorfer
here on my serial monitor I get:

Arduino really shows a lot of potential, I will try this with the output on pin 9 and my oscilloscope.

 Thank you
Jagau

Close