Energy Gains in Adam's patent.

  • 1.1K Views
  • Last Post 9 hours ago
Jagau posted this 07 September 2024

Is there energy Gains in Adam’s patent, the great question.


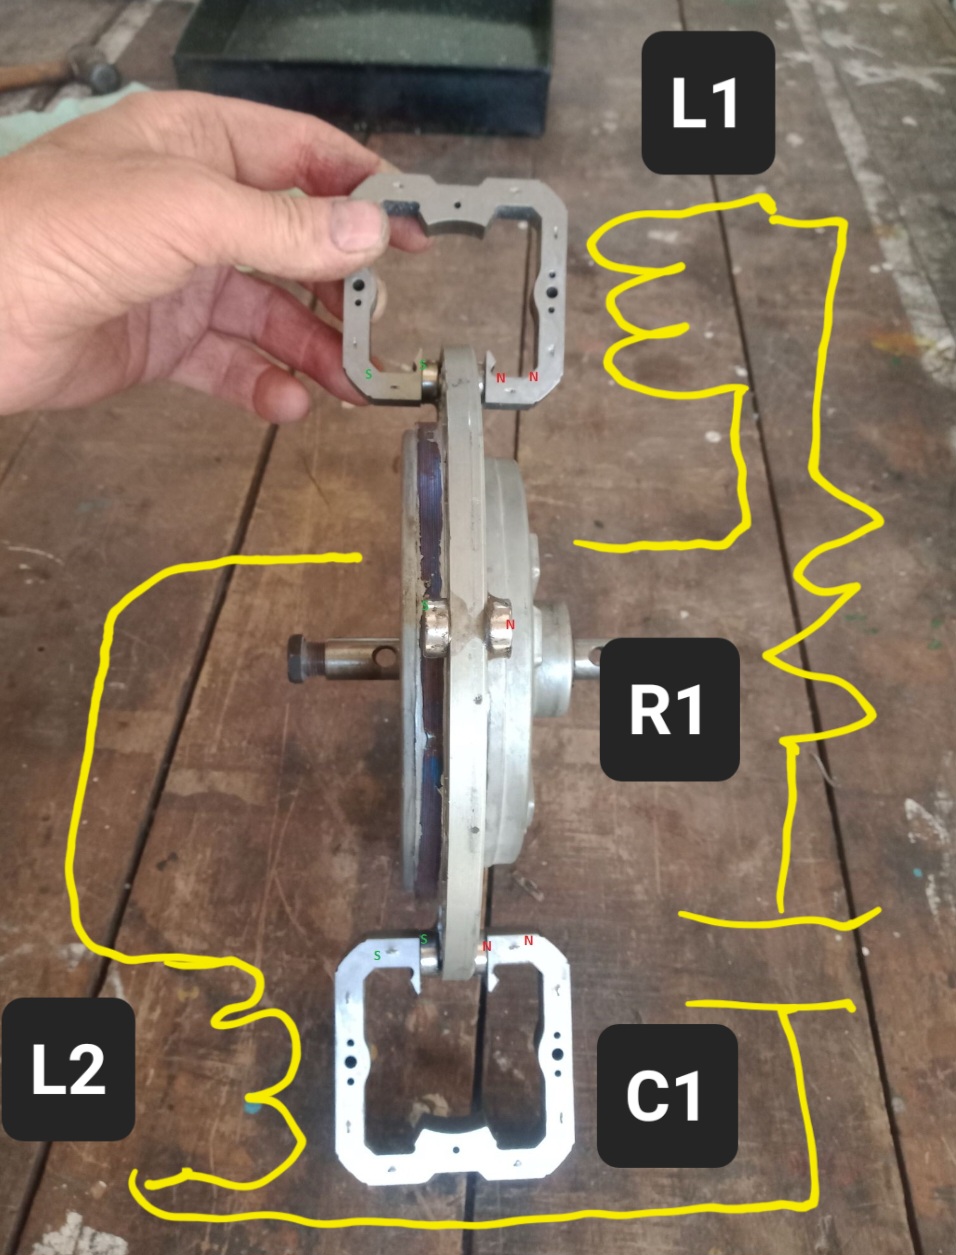
I built an Adams motor using a computer HDD to simplify the assembly of the bearings and with the installation of six permanent neodymium magnets on the rotor. This is Robert Adams’ first advice in order to understand the operation and then build a bigger one.

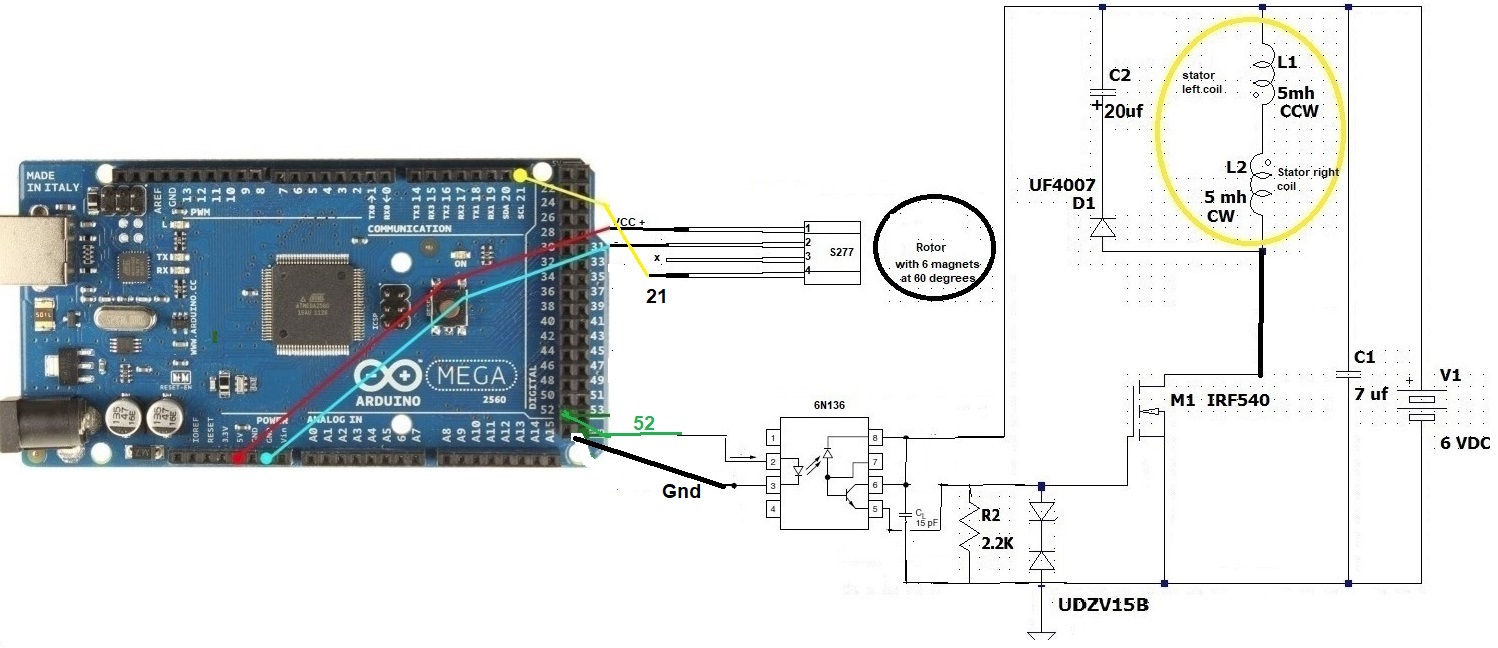
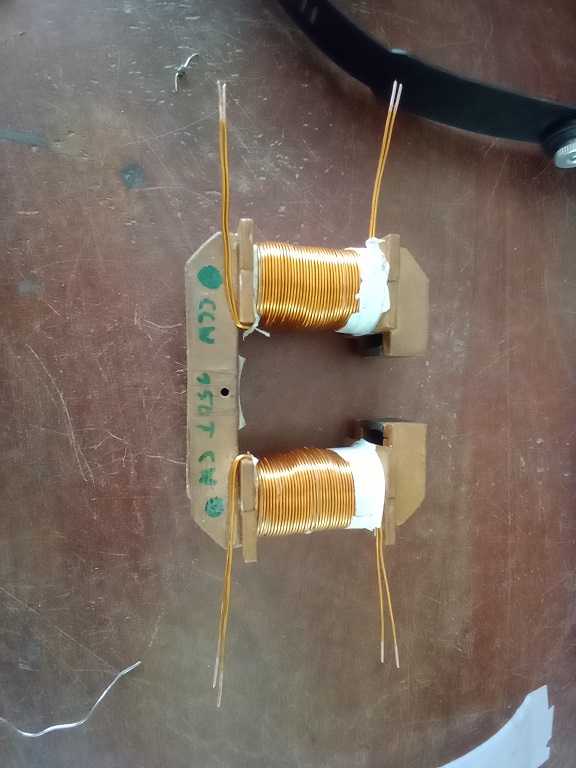
In order to study the behavior of the motor I use two 5 milli-henry coils on each side at 180 degrees from each other with the left side winding CCW and the right CW, the coils are connected in series.

The control system will be done with an Arduino mega 2560 using a hall effect sensor S277 for detecting the position of the rotor relative to the magnets. On the hall sensor S277 that I recovered from a computer fan, only the DO output (pin 2) will be used to give the interrupt detection instruction (it is in the Arduino program) in order to activate a 6N136  optocoupler to give a pulse on the Gate of the Nmos IRF3205 which will activate the two coils in series of the motor as declared by the inventor Mr. Robert Adams.


Photo to come

Jagau

Vidura posted this 2 weeks ago

In the short video below I show the results of the  scope traces of the current in the drivecoil. As you know current corresponds to the magnetic force , that is why it is the main concern of the test.

Vidura

Jagau posted this 2 weeks ago

Hi Vidura
You have done a huge job on Adams engine.
I like your perseverance and most importantly it inspires us all to continue.
Jagau

Jagau posted this 2 weeks ago

Hello Vidura


I saw in your video that you used two coils wound in a non-inductive way on double pole machine , it's an interesting concept.

When you have time, is the consumption in watts less than with a single  wound coil ?
What kind of controller do you use?

Jagau

Jagau posted this 2 weeks ago

This is the circuit with the Arduino controller that I am using now. I improved the speed of the transfer ratio by changing the optocoupler for a very fast 6N136. The BEMF produced in C2 20 Uf accumulates in less than a second.

The Arduino Controller is completely isolated from the operating circuit to avoid feedback and false readings.
Other improvements in testing in order to lower the input consumption in future study.

Jagau

Vidura posted this 2 weeks ago

Replying To: Jagau

Hey Jagau, the drivecoils are not cancelling as it seems, it is because one side is CW and one side CCW wound.

Below there is the comlete schematic of the driver , the PNP transistor could be left away if an inverting mosfet driver is used, I just utilized the components that I had at hand.


Anyway I was not convinced with this drivecircuit, looking for a better solution.

Vidura

Sandy posted this 2 weeks ago

Replying To: Vidura


Hi Vidura. I am new to this forum. I saw your progress on youtube and wish to make a suggestion, not related to the Adams motor but related to another experiment to which the apparatus you have built would adapt itself very well. I do not know if it is a viable path to overunity but I believe it is worth testing. You can see the principle at work in this video...

A much greater modulation of L can be obtained with a permanent magnet in the gap rather than a ferromagnetic slug, as demonstrated in my video. However, we want to avoid induction so two separate cores, (each with solenoids, like yours) wired in series but antiphase, so that induction is cancelled but L is still modulated may achieve better results. This could be combined with the pulse motor. This may be a way to load a mechanical generator without the usual reaction. Anyhow, nice machine. I like your work and thanks for sharing. Please see the crude drawing attached... L1 and L2 are connected in series forming LC circuit with C1 and R1 (load). Magnets modulate inductance of L1 and L2, synchronously exciting the circuit. Induced voltages are cancelled by wiring L1 and L2 out of phase. Admin please delete this comment if you feel it is distracting from the purpose of the thread. Kind regards, Sandy

Attached Files

Fighter posted this 2 weeks ago

Hi Sandy,

Welcome and no worries, your suggestion could be helpful.

I just fixed the YouTube link so it shows the video in your post and I also included in the post the image you attached.

Regards,

Fighter

"If you want to find the secrets of the universe, think in terms of energy, frequency and vibration."
Nikola Tesla
Vidura posted this 1 weeks ago

Today I finished another version of the drive circuit, as I found the one with the freewheeling diode not suitable in practice, there is too much energy lost at the off time. For other geometries of motor (much broader magnets and drive coils) it could work better. The original concept for the new circuit has been posted by Yoelmicro, I could not find any more in which thread, but he suggested this technique for efficiently recovering the energy of the electromagnet. I had to change the design to make use of the components which I had available. In this implementation the charge time of the inductor is similar to the recovery time, therefore the duration of the magnetic force is approximately doubled. Here the diagram:

If J1 is closed with a wirebridge the current of the inductor is fed back to the input, otherwise the output from the diodes should be redirected to another sink, like a battery or secondary load to avoid high voltage surges on the transistors.

Note that this circuit needs a supplyvoltage of 14-18v, the A3120 optodriver will not work with less voltage, In the next version this will be improoved to run it from a 12v battery.

Below a short video with some tests:

Vidura

Jagau posted this 6 days ago

Hello Vidura

Yes I remember the circuit that Yoelmicro used, however he used only one gate driver for the two mosfet gates.

I kept these two schematics that he called inductive gate load driver. Which makes the circuit less heavy I think and only requires one gate driver.

Jagau

Vidura posted this 5 days ago

Today I finished the second drivecoil:

In the test all coils are connected in series, only the bifilar is joined together. Due to a damage in the insulation there is a shorting between the two wires, so it can be used only that way. The test:

Vidura

Close